> ## Documentation Index
> Fetch the complete documentation index at: https://help.gorelo.io/llms.txt
> Use this file to discover all available pages before exploring further.
# Create an approval workflow
> Set up approval workflows in Gorelo using Contact Tags marked as approvers so clients can approve purchases, access requests, and other ticket actions.
Approvals are used when you need to reach out to a contact and have them approve something (for example, a new laptop purchase or access to a specific SharePoint site).
Individual contacts at each client can be designated as an approver by assigning them a Contact Tag that has been ***marked as an approver***.
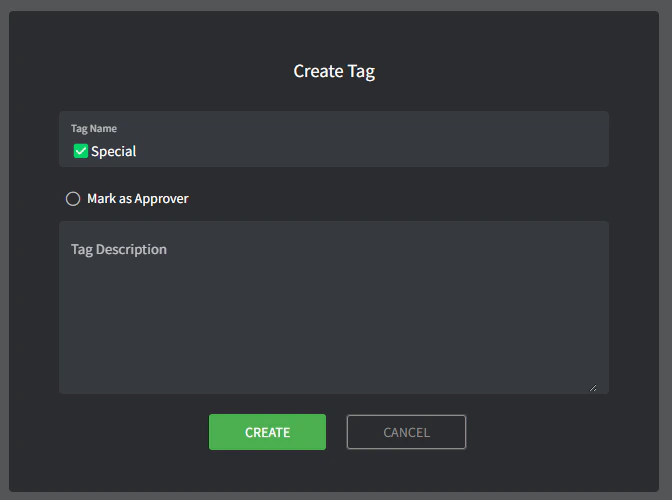
## Create an *Approver* tag
1. Navigate to Settings > [**Tags**](https://app.gorelo.io/Admin/admin-settings#tagmanagementsettings) > Contact Tags.
2. Create a **Contact Tag** (down the bottom).
* **Name**: this is the name of the tag (for example, ‘✅Special’).
* **Mark as Approver**: this is where you will configure it as an Approver tag, tick this box.
* **Description**: this is where you can describe the tag in more detail. It’s internal and only visible here.
## Designate a contact as an approver
1. Navigate to the **[Contact list](https://app-preview.gorelo.io/CRM/contact-list).**
2. Click the Contact you wish to designate as an Approver.
3. From the **Contact Tags** dropdown, select the newly created ‘✅Special’ tag.
4. In the **Description** field, describe anything extra related to what they can/can’t approve (or leave blank), e.g., *can only approve Engineering related requests.*
5. Click **Update**.
## Start the approval flow
1. Create or navigate to an existing ticket (make sure the client has at least one contact with an Approver tag).
2. Click the **+** button in the timeline tab and add an **Approval**.
3. Select one or multiple contacts that you’d like to email.
4. Type the approval comment.
5. Click **Submit** to send the email.
The selected Contacts will receive an email with the comment you typed and **YES/NO** buttons to approve or deny the approval request.
 ## Designate a contact as an approver
1. Navigate to the **[Contact list](https://app-preview.gorelo.io/CRM/contact-list).**
2. Click the Contact you wish to designate as an Approver.
3. From the **Contact Tags** dropdown, select the newly created ‘✅Special’ tag.
4. In the **Description** field, describe anything extra related to what they can/can’t approve (or leave blank), e.g., *can only approve Engineering related requests.*
## Designate a contact as an approver
1. Navigate to the **[Contact list](https://app-preview.gorelo.io/CRM/contact-list).**
2. Click the Contact you wish to designate as an Approver.
3. From the **Contact Tags** dropdown, select the newly created ‘✅Special’ tag.
4. In the **Description** field, describe anything extra related to what they can/can’t approve (or leave blank), e.g., *can only approve Engineering related requests.*
 5. Click **Update**.
## Start the approval flow
1. Create or navigate to an existing ticket (make sure the client has at least one contact with an Approver tag).
2. Click the **+** button in the timeline tab and add an **Approval**.
5. Click **Update**.
## Start the approval flow
1. Create or navigate to an existing ticket (make sure the client has at least one contact with an Approver tag).
2. Click the **+** button in the timeline tab and add an **Approval**.
 3. Select one or multiple contacts that you’d like to email.
4. Type the approval comment.
5. Click **Submit** to send the email.
3. Select one or multiple contacts that you’d like to email.
4. Type the approval comment.
5. Click **Submit** to send the email.