> ## Documentation Index
> Fetch the complete documentation index at: https://help.gorelo.io/llms.txt
> Use this file to discover all available pages before exploring further.

# Give contacts access to the Client Portal

> Set up client contacts to sign in to the Gorelo Client Portal, then control what each person sees with contact tags and per-item sharing for tickets, assets, invoices, projects, forms, and documents.

Any [contact](/contacts-overview) in Gorelo can sign in to the [Client Portal](/client-portal) with the email address on their contact record. There's no separate portal account or license to set up. What each contact sees depends on the contact tags you apply and the items you share with them.

## Before you start

Gorelo doesn't send a welcome or invitation email when you create a contact. To bring a contact into the portal, you need to:

<Steps>
  <Step title="Create the contact">
    Make sure the person exists as a contact with a **Primary Email** and the correct **Client**. See [Assign a contact to a client](/assign-contact-to-client#associate-tickets-with-contacts) to add one manually.

    To add many contacts at once, [import a CSV file](/contacts-overview#import-contacts), [sync licensed Microsoft 365 users through CIPP](/contacts-overview#microsoft-365-sync-via-cipp), or use the [Gorelo API](/api-overview).
  </Step>

  <Step title="Share your portal URL">
    Find your portal address in **Settings** > **Portal**. Send this URL to your clients yourself, for example in an onboarding email, a ticket reply, or your email signature.
  </Step>

  <Step title="The contact signs in">
    On the sign-in page, the contact either selects **Microsoft 365** single sign-on (SSO) or enters their email address to receive a magic link. The email they use must match the **Primary Email** on their contact record.
  </Step>
</Steps>

<Note>
  The portal recognizes contacts by email address only. If someone signs in with an address that isn't on a contact record, the magic link doesn't arrive and the portal shows no data.
</Note>

## What contacts see by default

A new contact with no portal tags can:

* Submit new tickets.
* View tickets where they're the requester, or where they're added as a Cc, third-party, or approval contact.
* View the ticket summary report for those same tickets.
* Download your Quick Connect remote support tools.
* Open documents and fill in forms that you've published to the portal for their client or for all clients.

This default level suits most end users who only need to raise and follow their own tickets.

## Choose the right access for each contact

Use the table below to decide what to grant. Tags apply per contact, so you can give a manager full visibility while other staff keep the default view.

| To let a contact see | Do this | Scope |
| - | - | - |
| All tickets for their client | Add the `Portal - All Tickets` tag | Per contact |
| Asset summary and warranty information | Add the `Portal - All Assets` tag | Per contact |
| Invoices for their client | Add the `Portal - All Invoices` tag | Per contact |
| Remaining block or limited hours | Turn on **Show in Client Portal** on the contract | Per contract |
| A project and its tasks | Add the contact to the project's **Shared with** field | Per project |
| A form | Turn on **Allow in portal** on the form | Per client or all clients |
| A document | Turn on **Publish to Portal** on the document | Per client or all clients |

### Add a portal tag to a contact

1. Open the [Contacts list](https://app.gorelo.io/crm/contact-list) and select the contact.
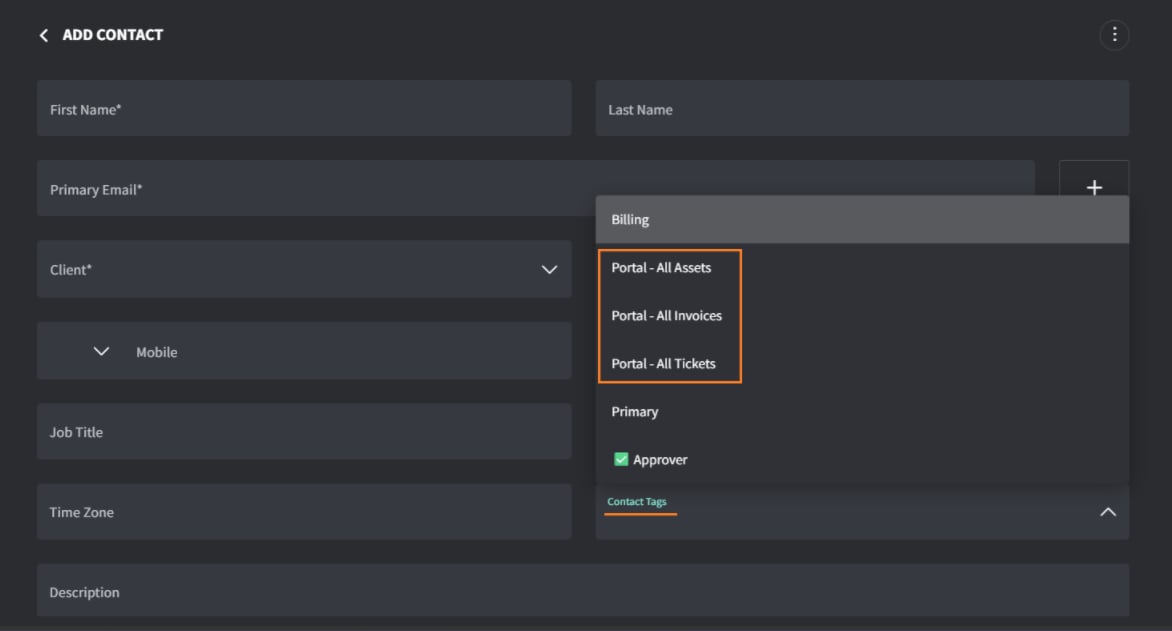
2. In **Contact Tags**, select one or more portal tags.
3. Save the contact.

<Frame>
  <img src="https://mintcdn.com/gorelo/Axn6NZsabvGJGJTP/images/client-portal/portal-contact-tags.png?fit=max&auto=format&n=Axn6NZsabvGJGJTP&q=85&s=2b8b5131ea7c0459b80fc961ee9603c1" alt="Contact Tags menu showing the Portal - All Assets, Portal - All Invoices, and Portal - All Tickets tags" width="1172" height="631" data-path="images/client-portal/portal-contact-tags.png" />
</Frame>

The tags give the following access:

* **`Portal - All Tickets`:** The contact sees every ticket that belongs to their client. The ticket summary report also covers all of the client's tickets.
* **`Portal - All Assets`:** The contact sees the asset summary report for their client, including device health and warranty information.
* **`Portal - All Invoices`:** The contact sees the client's approved and paid invoices from the last three months. Without this tag, the invoice section stays hidden, even for billing contacts.

### Show remaining hours on invoices

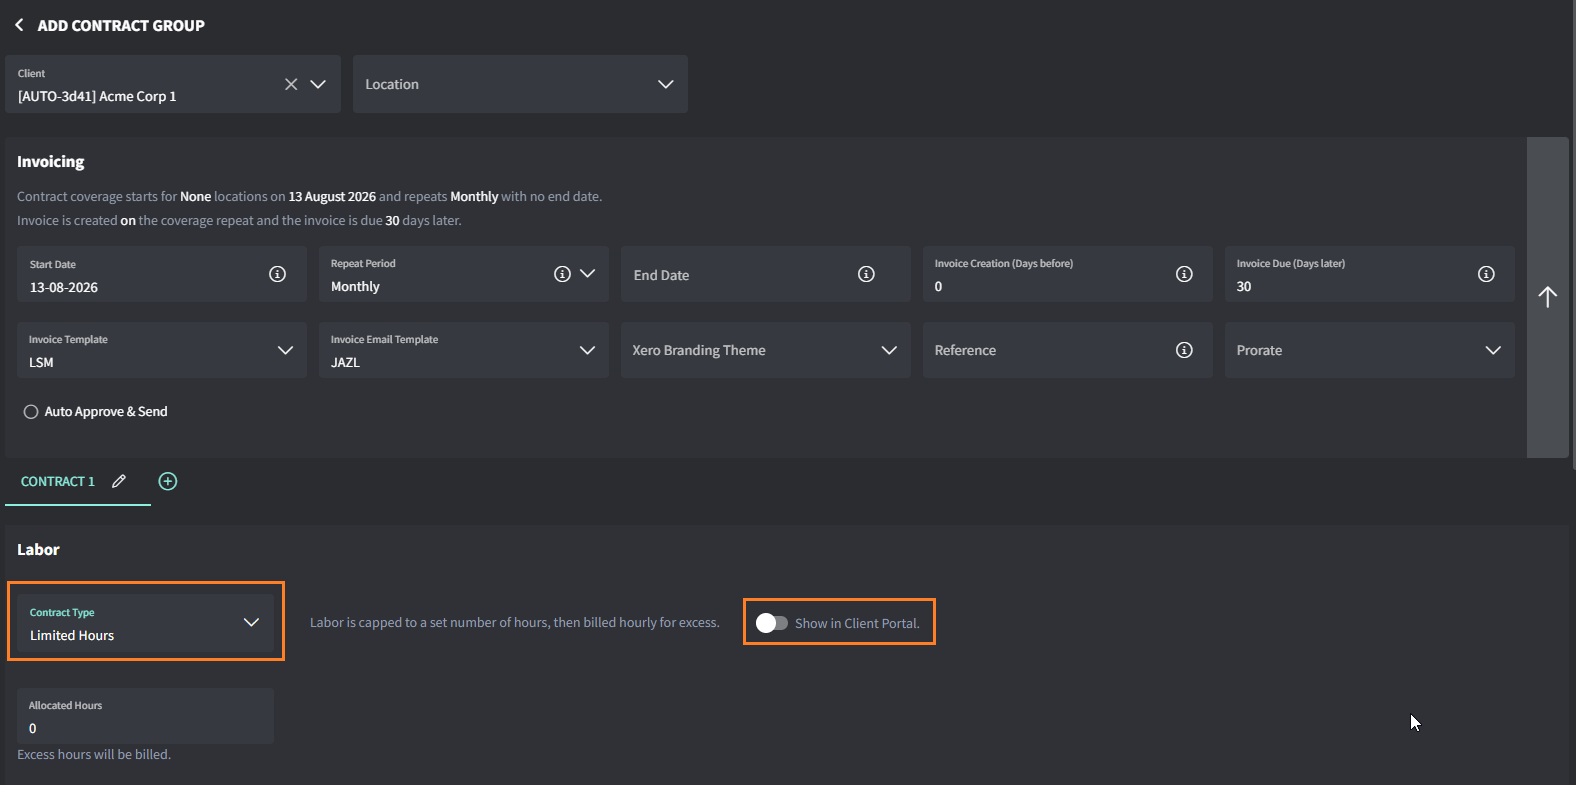
For clients on a [limited or block hours contract](/set-a-labor-rate), you can show the hours they have left on the portal's invoice list.

1. Open the contract.
2. In the **Labor** section, turn on **Show in Client Portal**.
3. Save the contract.
<Frame>
  <img src="https://mintcdn.com/gorelo/Axn6NZsabvGJGJTP/images/client-portal/portal-contract-remaining-hours.png?fit=max&auto=format&n=Axn6NZsabvGJGJTP&q=85&s=01e83d5613718c1c78ac72b34d50359c" alt="Contract labor section with the Show in Client Portal toggle next to the Limited Hours contract type" width="1576" height="785" data-path="images/client-portal/portal-contract-remaining-hours.png" />
</Frame>

Contacts with the `Portal - All Invoices` tag can then see the remaining hours on the invoice list.

### Share a project

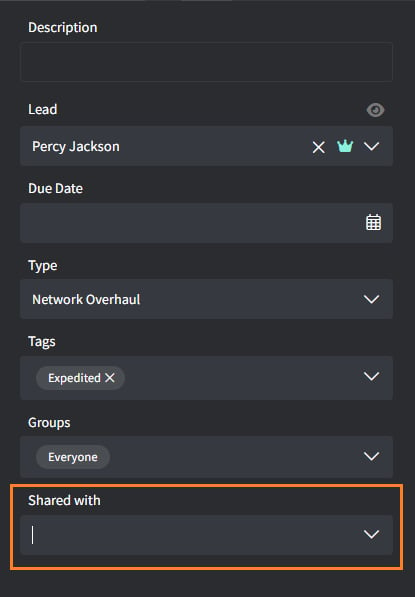
You share [projects](/projects) one at a time. A contact must be added to each project they need to follow.

1. Open the project.
2. In the project details on the right, select the contact in **Shared with**.
3. Save the project.
<Frame>
  <img src="https://mintcdn.com/gorelo/Axn6NZsabvGJGJTP/images/client-portal/portal-project-shared-with.png?fit=max&auto=format&n=Axn6NZsabvGJGJTP&q=85&s=82fcd6d640341cf7f4e09e672480ea47" alt="Project details panel with the Shared with field highlighted" width="415" height="597" data-path="images/client-portal/portal-project-shared-with.png" />
</Frame>

The contact can now follow the project's progress and tasks in the portal.

### Publish a form

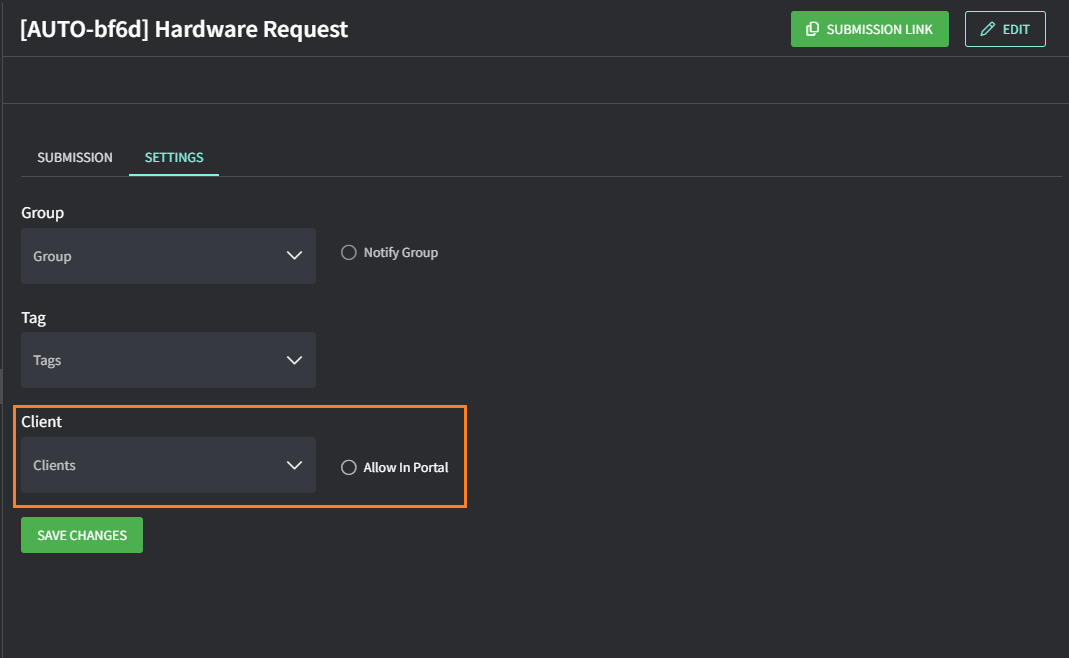
1. Open [**Forms**](https://app.gorelo.io/form/form-list) and select the form.
2. Select the **Settings** tab.
3. Optionally, select a **Client** to limit the form to that client's contacts.
4. Select **Allow In Portal**, then click **Save Changes**.
<Frame>
  <img src="https://mintcdn.com/gorelo/Axn6NZsabvGJGJTP/images/client-portal/portal-form-allow-in-portal.png?fit=max&auto=format&n=Axn6NZsabvGJGJTP&q=85&s=5c4d6c2666c8aa3648b7cc5508a4f4be" alt="Form settings tab with the Client field and Allow In Portal option highlighted" width="1069" height="658" data-path="images/client-portal/portal-form-allow-in-portal.png" />
</Frame>

If you leave **Client** empty, every contact in the portal sees the form. For more details, see [Publish a form](/publish-form).

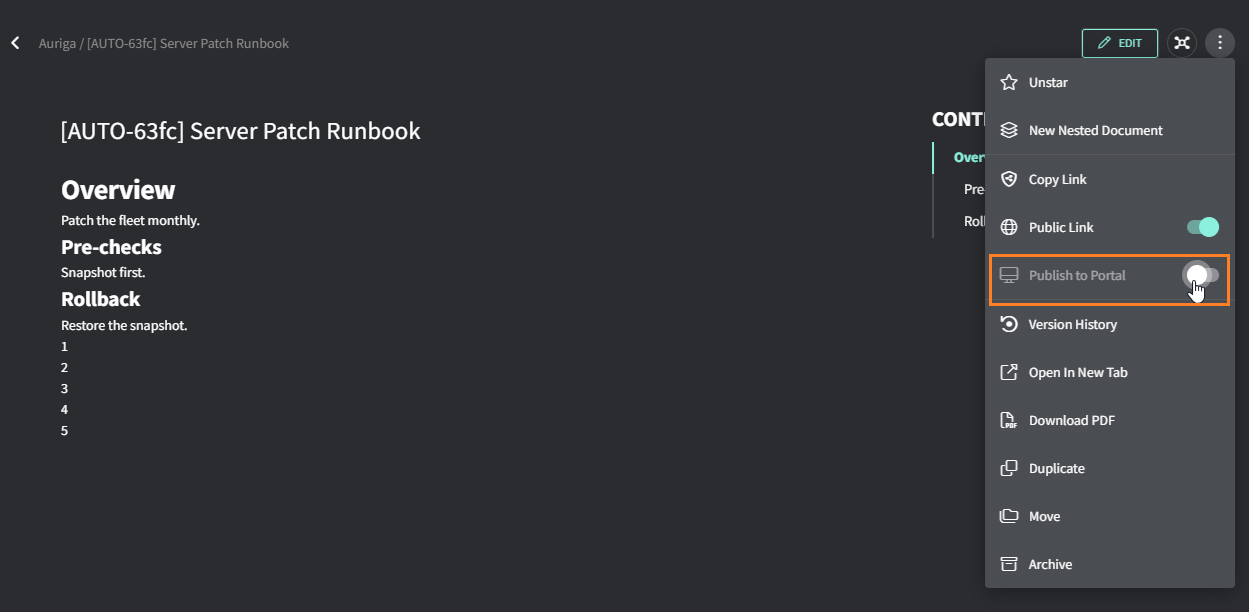
### Publish a document

1. Open the [document](/documents-overview).
2. Click the three-dot menu.
3. Turn on **Publish to Portal**.
<Frame>
  <img src="https://mintcdn.com/gorelo/Axn6NZsabvGJGJTP/images/client-portal/portal-doc-publish.png?fit=max&auto=format&n=Axn6NZsabvGJGJTP&q=85&s=1699f1788e93a8c4debde6282090af9a" alt="Document three-dot menu with the Publish to Portal toggle highlighted" width="1249" height="612" data-path="images/client-portal/portal-doc-publish.png" />
</Frame>

A document filed under a specific client is visible only to that client's contacts. A document under your own organization is visible to all contacts in the portal.

<Tip>
  To share a single document with someone who isn't a contact, turn on **Public Link** instead. Anyone with the link can open it without signing in.
</Tip>

## Example access setups

<table>
  <colgroup>
    <col width="25%" />

    <col width="35%" />

    <col width="40%" />
  </colgroup>

  <thead>
    <tr>
      <th>Role</th>
      <th>Portal tags</th>
      <th>Additional setup</th>
    </tr>
  </thead>

  <tbody>
    <tr>
      <td>Staff member who only raises tickets</td>
      <td>None</td>
      <td>None. They can submit tickets and follow the tickets they're on.</td>
    </tr>

    <tr>
      <td>Office manager who oversees all IT requests</td>
      <td><ul><li><code>Portal - All Tickets</code></li><li><code>Portal - All Assets</code> (optional)</li></ul></td>
      <td>Add <code>Portal - All Assets</code> if they also track devices and warranties.</td>
    </tr>

    <tr>
      <td>Finance contact</td>
      <td><ul><li><code>Portal - All Invoices</code></li></ul></td>
      <td>For block or limited hours contracts, turn on <strong>Show in Client Portal</strong> on the contract.</td>
    </tr>

    <tr>
      <td>Co-managed or internal IT lead</td>
      <td><ul><li><code>Portal - All Tickets</code></li><li><code>Portal - All Assets</code></li><li><code>Portal - All Invoices</code></li></ul></td>
      <td>Share relevant projects. If they need to work inside Gorelo itself, they need a co-managed seat rather than portal access.</td>
    </tr>
  </tbody>
</table>

## Troubleshooting

<AccordionGroup>
  <Accordion title="My client never received a welcome email">
    Gorelo doesn't send welcome or invitation emails. Send your portal URL to the contact yourself. They sign in with SSO or request a magic link from the sign-in page.
  </Accordion>

  <Accordion title="The magic link email doesn't arrive">
    Check that the email address the person typed exactly matches the **Primary Email** on their contact record. If no contact exists for that address, Gorelo doesn't send a link. Also ask them to check their spam or quarantine folder.
  </Accordion>

  <Accordion title="The contact signs in but sees nothing">
    This usually means the address they signed in with doesn't belong to a contact. It's common with Microsoft 365 SSO when the person's sign-in address differs from the email on their contact record. Add the address to the contact, or create the contact, then ask them to sign in again.
  </Accordion>

  <Accordion title="The contact can't see a ticket, invoice, or report I expected">
    Confirm that the contact belongs to the right client and has the matching portal tag. For example, a contact without `Portal - All Tickets` sees only the tickets they're on. Without `Portal - All Invoices`, the invoice section doesn't appear.
  </Accordion>

  <Accordion title="Ticket times show in the wrong time zone">
    The portal displays times in the time zone of the contact's browser or operating system, not the time zone on the contact record. Ask the contact to check their device's time zone settings.
  </Accordion>
</AccordionGroup>

## Related pages

<CardGroup cols={2}>
  <Card title="Client Portal" icon="browser" href="/client-portal">
    Learn what the portal offers and how to brand it.
  </Card>

  <Card title="How contacts work" icon="address-book" href="/contacts-overview">
    Create, import, and sync contacts.
  </Card>
</CardGroup>


This documentation is built and hosted on [Mintlify](https://mintlify.com), a developer documentation platform.